这是本文档旧的修订版!
目录
NP-8132-V0B
资源特性
- CPU:Rockchip RK3399 6 核处理器,2*A73 ( up to 1.8GHz ) + 4*A53 ( up to 1.4GHz )
- GPU:Mail-T860 GPU MP4 四核心 GPU ,支持 OpenGL ES1.1/2.0/3.0/3.1,OpenVG1.1,OpenCL,DX11
- 内存:板载 DDR4 2GB (可选 4G)
- 存储 :板载 eMMC 16G
- TF :1*TF 卡接口,最大支持 32GB
- 网络: 2 * 10/100/1000Mbps 速率自侦测以太网口,1 *10/100Mbps 速率自侦测以太网口
- 4G/5G:1*M.2接口 支持
- 串口: 4xCOM 其中2*RS232,2*RS485
- HDMI:1 * HDMI 接口 ,最大支持 1920×1080 输出
- USB:2*USB 接口
- KEY:1*Return,U-boot 复用
- OTG:1*OTG
- Debug:1* debug 接口
- LED:3*系统指示灯可控) 1*电源指示灯
- IO:1*左右拨码开关、1* 10段位编码开关
- CANBUS: 2* spican
- 扩展IO:支持 NXP PCA9555 16*GPO,16*GPI
接口布局和尺寸
接口概览
快速上手
系统下载
Linux系统
Buildroot: 系统下载链接
工具链下载
工具
烧录工具下载
烧录工具
系统烧录
1、下载烧录工具:
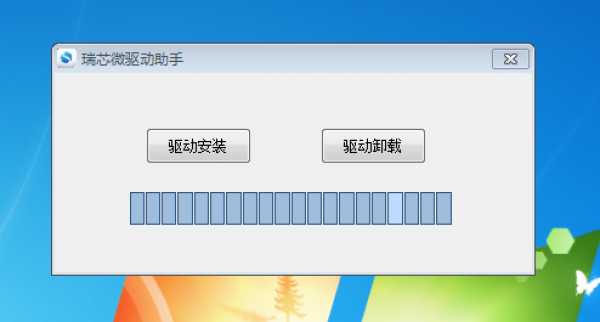
- 请务必先安装驱动,烧录工具链接含有驱动DriverAssitant压缩包,解压后点击DriverInstall.exe安装驱动
2、开始烧录:
- 将数据线一端与主板OTG连接,另一端连接电脑。注意烧录前,需要按住boot_key按键再接通电源
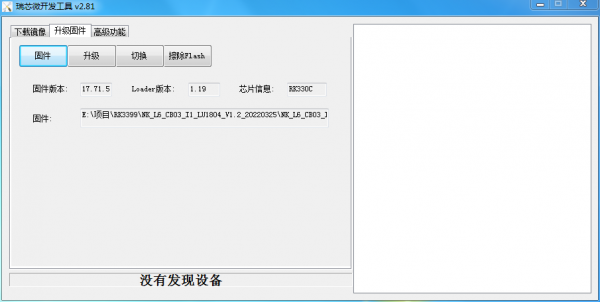
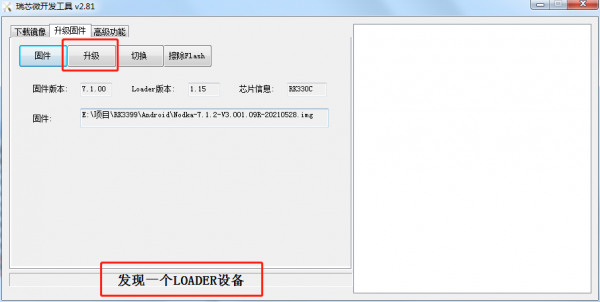
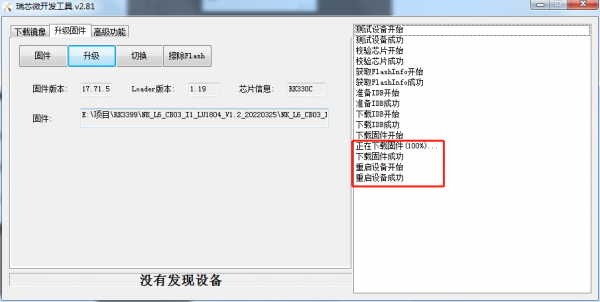
- 打开压缩包中开发工具 » 升级固件 » 点击固件并选择好固件 » 点升级开始烧录
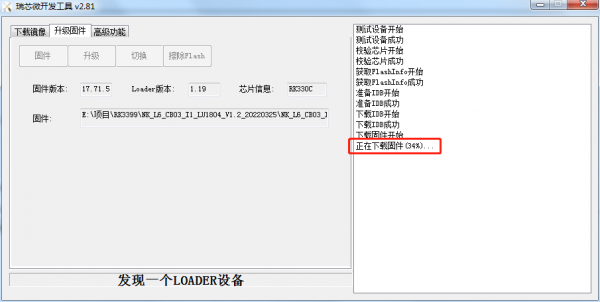
- 烧录过程中的状态,会有进度显示
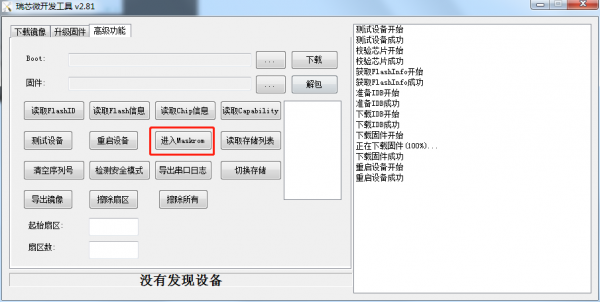
- 更换系统平台(例如安卓切换到Linux)时,可能出现无法烧录的情况,此时打开开发工具 » 高级功能 » 点击进入Maskrom切换烧录模式后烧录系统
3、完成烧录:
- 烧录过程不需要任何操作,烧录成功后右框会显示设备自动重启,烧录完成。
串口调试
- Windows 上一般用 putty 或 SecureCRT。以 putty 为例介绍如何使用串口调试功能
- putty下载链接:下载链接,选择putty.exe
- 串口通讯参数配置:
 波特率:1500000
 数据位:8
 停止位:1
 奇偶校验:无
 流控:无
- putty设置界面如下:
 1.Connection type设置为Serial
 2.Serial line设置为pc端连接的串口(此项填写pc端实际的串口号)
 3.Speed设置为150000
 4.点击Open按钮打开终端
- 查看PC端的串口号:
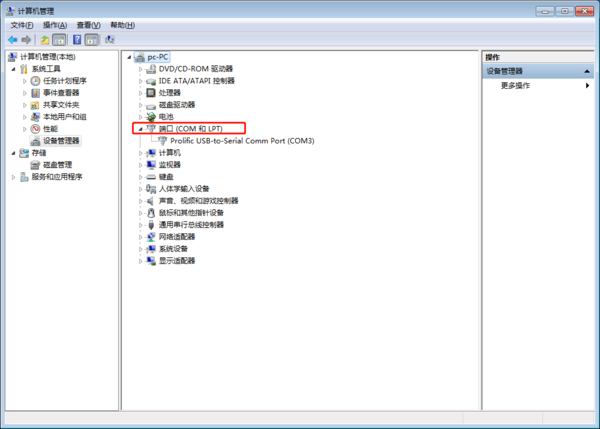
- 右键点击我的电脑->管理->设备管理器->端口(COM和LPT)找到本机对应的串口
- 如无设备请先确定pc端是否自带串口及驱动是否安装
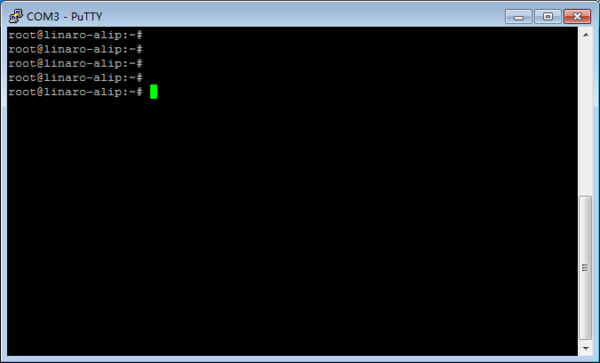
- 进入串口调试终端:
- 如图进入交互界面,敲击回车或者输入命令会有反馈
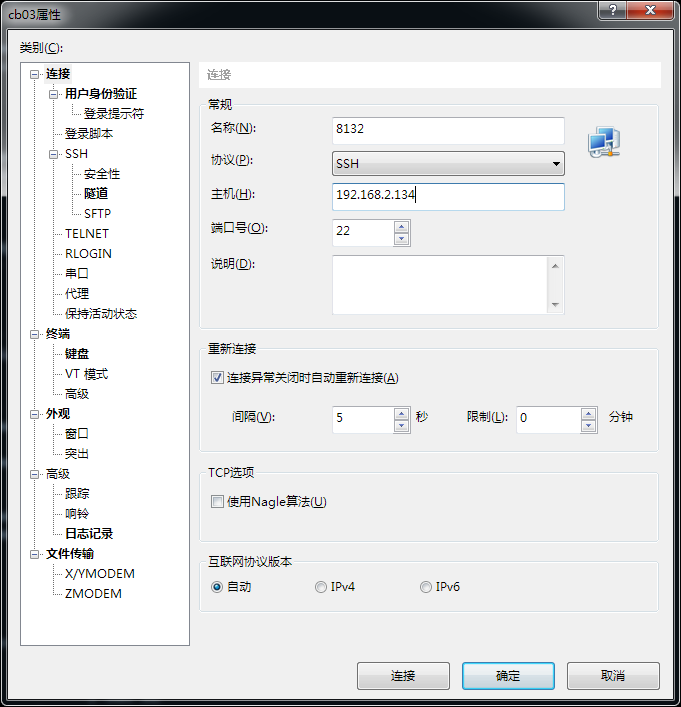
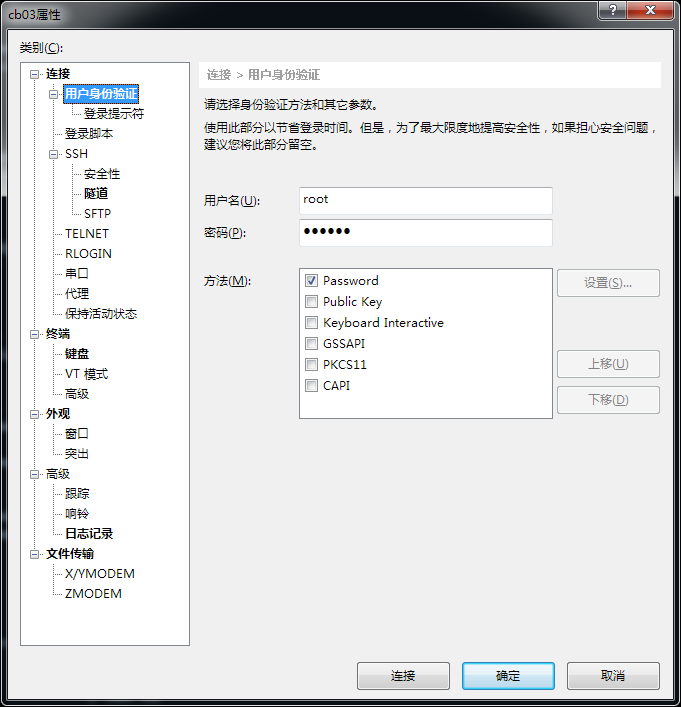
ssh连接
Linux系统的使用
以太网使用方法
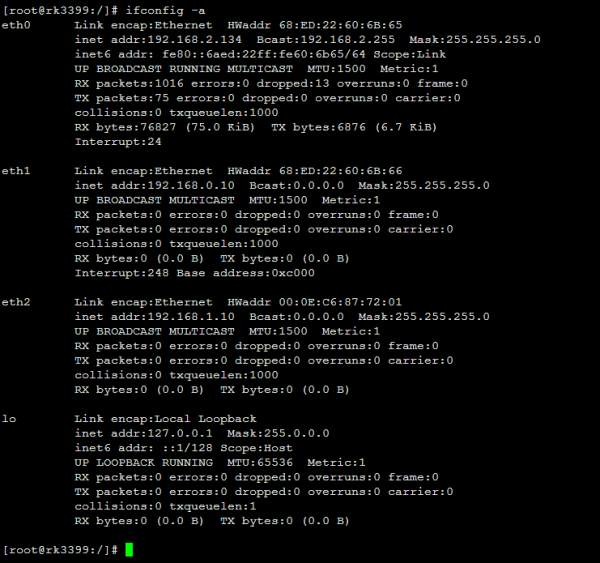
查看所有网络设备
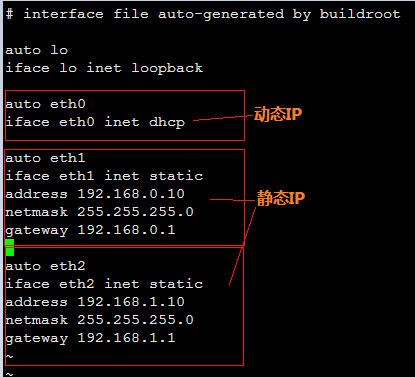
设置静态IP与动态IP
设置DNS
# vi /etc/resolv.conf
Ping测试
# ping 192.168.2.238 -s 65000  //指定数据包大小
# ping 192.168.2.238 -c 10   //指定ping次数
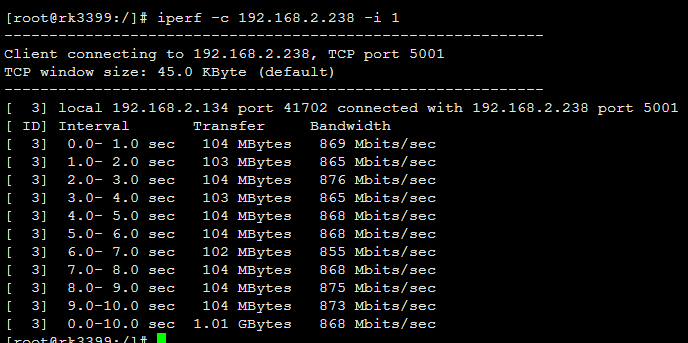
Iperf Throughput 测试
需要与server端配合使用, server端需要安装iperf测试工具
在server端开启iperf:
$ iperf -s

在测试端开启iperf测试:
# iperf -c 192.168.2.238 -i 1   //192.168.2.238 为server端IP地址
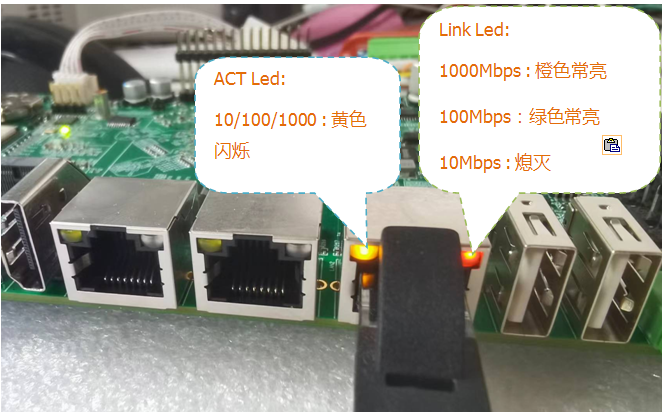
网口指示灯状态
串口使用方法
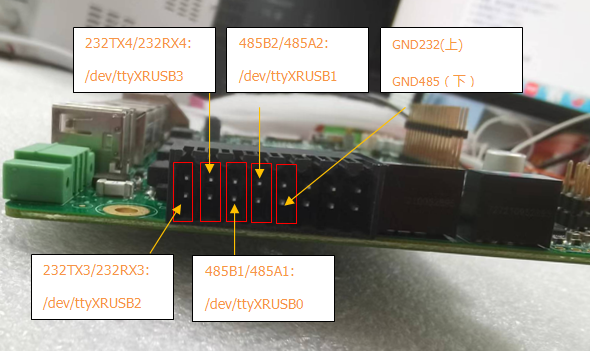
串口定义
RS485
 对应设备节点:
 485A1/B1      --  /dev/ttyXRUSB0
 485A2/B2      --  /dev/ttyXRUSB1
测试方法 硬件连接:将485A1/B1 对接 485A2/B2: 设置串口:
 stty -F /dev/ttyXRUSB0 ignbrk -brkint -icrnl -imaxbel -opost -onlcr -isig -icanon -iexten -echo -echoe -echok -echoctl -echoke
 stty -F /dev/ttyXRUSB1 ignbrk -brkint -icrnl -imaxbel -opost -onlcr -isig -icanon -iexten -echo -echoe -echok -echoctl -echoke
使用485A1/B1接收:
cat /dev/ttyXRUSB0
使用485A2/B2发送
echo abcdefghijklmn >/dev/ttyXRUSB1
在接收端可以收到字符:
RS232
 对应设备节点:
 RS232RX3/TX3      --  /dev/ttyXRUSB2
 RS232RX4/TX4      --  /dev/ttyXRUSB3
测试方法 硬件连接:将RS232RX3/TX3 交叉对接 RS232RX4/TX4: 设置串口:
 stty -F /dev/ttyXRUSB2 ignbrk -brkint -icrnl -imaxbel -opost -onlcr -isig -icanon -iexten -echo -echoe -echok -echoctl -echoke
 stty -F /dev/ttyXRUSB3 ignbrk -brkint -icrnl -imaxbel -opost -onlcr -isig -icanon -iexten -echo -echoe -echok -echoctl -echoke
使用RS232RX3/TX3接收:
cat /dev/ttyXRUSB2
使用RS232RX4/TX4发送:
echo abcdefghijklmn >/dev/ttyXRUSB3
在接收端可以收到字符:
CANBUS使用方法
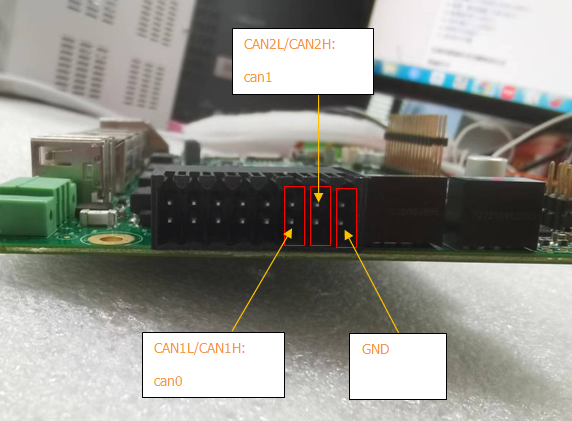
CAN接口定义
CAN测试方法,连接CAN1L – CAN2L ,CAN1H – CAN2H 设置can:
ip link set can0 down
ip link set can0 type can bitrate 125000
ip link set can0 up
ip link set can1 down
ip link set can1 type can bitrate 125000
ip link set can1 up
使用can0 接收:
candump can0
使用can1发送数据帧:
cansend can1 123#1122334455667788
查看接收端:
C编程指导参考:CAN应用编程
左右拨码开关使用方法
[root@rk3399:~]# evtest                                --------------> 输入命令evtest
No device specified, trying to scan all of /dev/input/event*
Available devices:
/dev/input/event0:	ff420030.pwm
/dev/input/event1:	gpio-decoder
/dev/input/event2:	gpio-keys
/dev/input/event3:	rk29-keypad
Select the device event number [0-3]: 2                 -------------> 选择2 gpio-keys
Input driver version is 1.0.1
Input device ID: bus 0x19 vendor 0x1 product 0x1 version 0x100
Input device name: "gpio-keys"
Supported events:
Event type 0 (EV_SYN)
Event type 1 (EV_KEY)
  Event code 105 (KEY_LEFT)
  Event code 106 (KEY_RIGHT)
Properties:
Testing ... (interrupt to exit)
Event: time 1654670127.676876, type 1 (EV_KEY), code 105 (KEY_LEFT), value 0
Event: time 1654670127.676876, -------------- SYN_REPORT ------------
Event: time 1654670127.693874, type 1 (EV_KEY), code 106 (KEY_RIGHT), value 1         -------------> 拨到右边时打印1
Event: time 1654670127.693874, -------------- SYN_REPORT ------------
Event: time 1654670128.597949, type 1 (EV_KEY), code 106 (KEY_RIGHT), value 0
Event: time 1654670128.597949, -------------- SYN_REPORT ------------
Event: time 1654670128.610192, type 1 (EV_KEY), code 105 (KEY_LEFT), value 1          -------------> 拨到左边时打印1
Event: time 1654670128.610192, -------------- SYN_REPORT ------------
C编程指导参考:Switch应用编程
WATCHDOG使用方法
设置喂狗timeout时间
i2ctransfer -y -f 4 w3@0x15 0x00 0x02 0x00    (30秒)
i2ctransfer -y -f 4 w3@0x15 0x00 0x02 0x01     (60秒)
以此类比 0x00=30s 0x01=60s 0x03=90s 0x04=120s 0x05=150s 0x06=180s
打开watchdog
i2ctransfer -y -f 4 w3@0x15 0x00 0x03 0x01
喂狗:
i2ctransfer -y -f 4 w3@0x15 0x00 0x04 0x01
LED使用方法
系统共有8个LED,pwr_led不可以控制其中7个LED均可控,系统下对应的设备接口为:
[root@rk3399:~]# cd /sys/class/leds/
[root@rk3399:/sys/class/leds]# ls
 mmc1::	sys_led  work_led1  work_led2  work_led3  work_led4  work_led5	work_led6
控制work_led1熄灭
echo 0 >/sys/class/leds/work_led1/brightness
控制work_led1点亮
echo 1 >/sys/class/leds/work_led1/brightness
其他LED类似
RTC使用方法
查看当前系统时间:
[root@rk3399:~]# date
Wed Jun  8 15:54:09 CST 2022
设置同步硬件时钟:
[root@rk3399:/]# date -s "2022-06-08 17:01:01"
Wed Jun  8 17:01:01 CST 2022
[root@rk3399:/]# hwclock -w
[root@rk3399:/]# hwclock -r
Wed Jun  8 17:01:09 2022  0.000000 seconds
关机断电5秒以上,再开机查看系统时间是否保存:
 [root@rk3399:/]# date
 Wed Jun  8 17:02:30 CST 2022
TFCARD使用方法
接入TFCARD,如果TFCARD有分区,系统会自动挂载到/mnt/sdcard
[root@rk3399:/]# df
Filesystem     1K-blocks    Used Available Use% Mounted on
/dev/root       14781436  480548  13675260   4% /
devtmpfs         1962984       0   1962984   0% /dev
tmpfs            1963920      28   1963892   1% /dev/shm
tmpfs            1963920     176   1963744   1% /tmp
tmpfs            1963920     304   1963616   1% /run
/dev/mmcblk0p6   3462176 2768616    497976  85% /mnt/sdcard
十段位编码开关使用方法
[root@rk3399:~]# evtest                                             --------------> 输入命令evtest
No device specified, trying to scan all of /dev/input/event*
Available devices:
/dev/input/event0:	ff420030.pwm
/dev/input/event1:	gpio-decoder
/dev/input/event2:	gpio-keys
/dev/input/event3:	rk29-keypad
Select the device event number [0-3]: 1                             -------------> 选择1 gpio-decoder
Input driver version is 1.0.1
Input device ID: bus 0x19 vendor 0x0 product 0x0 version 0x0
Input device name: "gpio-decoder"
 Supported events:
   Event type 0 (EV_SYN)
   Event type 3 (EV_ABS)
   Event code 0 (ABS_X)
     Value      6
     Min        0
     Max       15
Properties:
Testing ... (interrupt to exit)
Event: time 1654670726.561933, type 3 (EV_ABS), code 0 (ABS_X), value 7        -------------> 旋转编码开关,打印上报对应的值。
Event: time 1654670726.561933, -------------- SYN_REPORT ------------
Event: time 1654670728.565864, type 3 (EV_ABS), code 0 (ABS_X), value 8
Event: time 1654670728.565864, -------------- SYN_REPORT ------------
Event: time 1654670729.567865, type 3 (EV_ABS), code 0 (ABS_X), value 9
Event: time 1654670729.567865, -------------- SYN_REPORT ------------
Event: time 1654670731.571873, type 3 (EV_ABS), code 0 (ABS_X), value 0
Event: time 1654670731.571873, -------------- SYN_REPORT ------------
C编程指导参考:Rotary应用编程
扩展IO卡使用方法
GPO1~GPO16 对应的GPIO编号依次为480~495
GPI1~GPI16 对应的GPIO编号依次为496~511
系统支持Linux标准的sysfs gpio操作,以GPO1(480)为例:
[root@rk3399:/sys/class/gpio]# echo 480 >export                      -------------> 导出GPO1
[root@rk3399:/sys/class/gpio]# echo out >gpio480/direction           -------------> 设置为输出
[root@rk3399:/sys/class/gpio]# echo 0 >gpio480/value                 -------------> 设置为低电平输出
[root@rk3399:/sys/class/gpio]# echo 1 >gpio480/value                 -------------> 设置为高电平输出
C编程指导参考:GPIO应用编程
USB接口使用
系统支持U盘自动挂载:/media/usb0
 [root@rk3399:/]# df
 Filesystem     1K-blocks   Used Available Use% Mounted on
/dev/root       14781436 480556  13675252   4% /
devtmpfs         1962984      0   1962984   0% /dev
tmpfs            1963920     28   1963892   1% /dev/shm
tmpfs            1963920    184   1963736   1% /tmp
tmpfs            1963920    288   1963632   1% /run
/dev/sda1        1046512   2728   1043784   1% /media/usb0
CODESYS 实时性支持
系统已支持Fully Preemptible Kernel(RT),实时性内核版本为:
[root@rk3399:/]# uname -r
 4.4.167-rt176
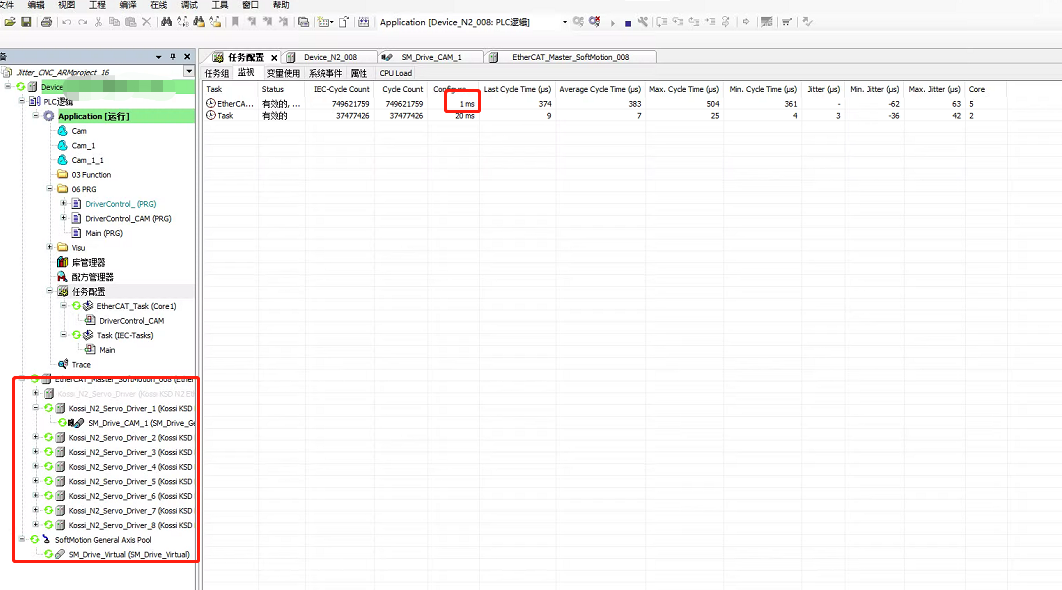
如下图为实时系统连接8台伺服间隔1ms运行效果:
CPU core分布:
cpu0:linux system
cpu1:none
cpu2:none
cpu3:task
cpu4: eth0
cpu5: codecsys run time task
Linux C编程指导
交叉编译环境
1. 建议主机环境:
Ubuntu 18.04 x86_64
2. 下载交叉编译工具链:
工具链下载地址:交叉编译工具链
3. 安装编译环境: 将下载的工具包解压,如解压到/usr/bin/下,配置环境变量:
export PATH=$PATH:/usr/bin/gcc-linaro-6.3.1-2017.05-i686_aarch64-linux-gnu/bin/
以上只是临时生效,开机自动配置环境变量,编辑/etc/profile 这个文件,在末尾添加上面配置内容即可 。
4. 查看是否安装正确:
aarch64-linux-gnu-gcc -v
系统有打印Gcc 版本即为正常:
GPIO应用编程
系统下操作GPIO的方式参考IO使用方法
C参考代码如下:
#include <stdio.h>
#include <stdlib.h>
#include <sys/types.h>
#include <sys/stat.h>
#include <fcntl.h>
#include <unistd.h>
#include <string.h>
static char gpio_path[100];
//设置GPIO方向、高低电平
static int gpio_config(const char *file, const char *value)
{
	char config_path[100];
	int len;
	int fd;
	sprintf(config_path, "%s/%s", gpio_path, file);
	if (0 > (fd = open(config_path, O_WRONLY)))
	{
		perror("open error");
		return fd;
	}
	len = strlen(value);
	if (len != write(fd, value, len))
	{
		perror("write error");
		close(fd);
		return -1;
	}
	close(fd);
	return 0;
}
//获取GPIO的方向、电平
static int gpio_get(const char *file)
{
	char get_path[100];
	char buf[10]={"\0"};
	int len;
	int fd;
	sprintf(get_path, "%s/%s", gpio_path, file);
	if (0 > (fd = open(get_path, O_RDWR)))
	{
		perror("open error");
		return fd;
	}
	if ( 0 > read(fd,buf,10))
	{
		perror("read error");
		return fd;
	}
	printf("  %s : %s",file,buf);
	close(fd);
	return 0;
}
int main(int argc, char *argv[])
{
	 if (4 != argc)
	{
		if (3 != argc)
		{
			fprintf(stderr, "set gpio out : %s <gpio> <out> <value>\n", argv[0]);
			fprintf(stderr, "set gpio in  : %s <gpio> <in>\n", argv[0]);
			exit(-1);
		}
	}
	sprintf(gpio_path, "/sys/class/gpio/gpio%s", argv[1]);
	if (access(gpio_path, F_OK))
	{
		printf("%s inexistence,export %s... \n",gpio_path,argv[1]);
		int fd;
		int len;
		if (0 > (fd = open("/sys/class/gpio/export", O_WRONLY)))
		{
			perror("open error"); exit(-1);
		}
		len = strlen(argv[1]);
		if (len != write(fd, argv[1], len))
		{
			perror("write error");
			close(fd);
			exit(-1);
		}
		close(fd);
	}
	if (gpio_config("direction", argv[2]))
		exit(-1);
	if ( 0 == strcmp("out",argv[2] ) && argc == 4 )
	{
		if(gpio_config("value", argv[3]))
		exit(-1);
	}
	printf("GPIO%s:\n",argv[1]);
	if (gpio_get("direction"))
		exit(-1);
	if (gpio_get("value"))
		exit(-1);
	 exit(0);
}
交叉编译源码:
aarch64-linux-gnu-gcc -o gpio gpio.c
将编译好的gpio程序使用scp 拷贝到8132 主板上,执行测试:
使用方法:
set gpio out : ./gpio <gpio> <out> <value>
set gpio in  : ./gpio <gpio> <in>
Switch应用编程
参考系统下操作Switch的方法:左右拨码开关使用方法,获取到switch的设备节点为
/dev/input/event2
C参考代码如下:
#include <unistd.h>
#include <fcntl.h>
#include <stdio.h>
#include <stdlib.h>
#include <linux/input.h>
#include <sys/select.h>
#define INPUT_DEVICE "/dev/input/event2"
int main(int argc, char **argv){
	int fd;
	struct input_event event;
	ssize_t bytesRead;
	int ret;
	fd_set readfds;
	if ( 0 > (fd = open(INPUT_DEVICE,O_RDONLY)))
	{
		perror("open error");
		return fd;
	}
	while(1){
		FD_ZERO(&readfds);
		FD_SET(fd,&readfds);
		ret = select(fd + 1, &readfds, NULL, NULL, NULL);
		if (ret == -1){
			fprintf(stderr,"select call on%s : an error ocurred",argv[1]);
		break;
		}
		if(FD_ISSET(fd,&readfds)){
			bytesRead = read(fd, &event,sizeof(struct input_event));
			if(bytesRead == -1 )
				fprintf(stderr,"bytesRead :%ld : an error ocurred",bytesRead);
			}

		if (event.type == EV_KEY && event.code == KEY_RIGHT){
			if(event.value == 1)
				printf("Switch on the right\n");
			}
		if (event.type == EV_KEY && event.code == KEY_LEFT){
			if(event.value == 1)
				printf("Switch on the left\n");
			}
	}
	close(fd);
	return EXIT_SUCCESS;
}
交叉编译源码:
aarch64-linux-gnu-gcc -o switch switch.c
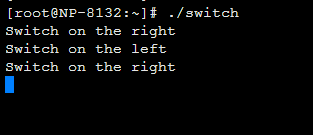
将编译好的程序使用scp 拷贝到8132 主板上,执行测试,拨动switch打印如下:
Rotary应用编程
参考系统下操作Rotary的方法:编码开关使用方法,获取到Rotary的设备节点为
/dev/input/event1
C参考代码如下:
#include <unistd.h>
#include <fcntl.h>
#include <stdio.h>
#include <stdlib.h>
#include <linux/input.h>
#include <sys/select.h>
#define INPUT_DEVICE "/dev/input/event1"
int main(int argc, char **argv){
	int fd;
	struct input_event event;
	ssize_t bytesRead;
	int ret;
	fd_set readfds;
	if ( 0 > (fd = open(INPUT_DEVICE,O_RDONLY)))
	{
		perror("open error");
		return fd;
	}
	while(1){
		FD_ZERO(&readfds);
		FD_SET(fd,&readfds);
		ret = select(fd + 1, &readfds, NULL, NULL, NULL);
		if (ret == -1){
			fprintf(stderr,"select call on%s : an error ocurred",argv[1]);
		break;
		}
		if(FD_ISSET(fd,&readfds)){
			bytesRead = read(fd, &event,sizeof(struct input_event));
			if(bytesRead == -1 )
				fprintf(stderr,"bytesRead :%ld : an error ocurred",bytesRead);
			}
		if (event.type == EV_ABS && event.code == ABS_X){
				printf("Rotary value is : %d \n",event.value);
			}
	}
	close(fd);
	return EXIT_SUCCESS;
}
交叉编译源码:
aarch64-linux-gnu-gcc -o rotary rotary.c
将编译好的程序使用scp 拷贝到8132 主板上,执行测试,拨动rotary打印如下
CAN应用编程
参考系统下操作CANBUS的方法:CANBUS使用方法,设置can:
ip link set can0 down
ip link set can0 type can bitrate 125000
ip link set can0 up
ip link set can1 down
ip link set can1 type can bitrate 125000
ip link set can1 up
C参考代码如下:
#include <stdio.h>
#include <stdlib.h>
#include <string.h>
#include <unistd.h>
#include <sys/ioctl.h>
#include <sys/socket.h>
#include <linux/can.h>
#include <linux/can/raw.h>
#include <net/if.h>
int main(int argc, char **argv)
{
	struct ifreq ifr_recv = {0};
	struct ifreq ifr_send = {0};
	struct sockaddr_can addr_recv = {0};
	struct sockaddr_can addr_send = {0};
	struct can_frame frame_recv = {0};
	struct can_frame frame_send = {0};
	int sockfd_r = -1;
	int sockfd_s = -1;
	int ret, i;
	if ( 3 != argc )
	{
		fprintf(stderr, "user : %s <can_recv> <can_send>\n", argv[0]);
		exit(EXIT_FAILURE);
	}
	if ( 0 > (sockfd_r = socket(PF_CAN, SOCK_RAW, CAN_RAW)))
	{
		perror("socket error");
		exit(EXIT_FAILURE);
	}
	if ( 0 > (sockfd_s = socket(PF_CAN, SOCK_RAW, CAN_RAW)))
	{
		perror("socket error");
		exit(EXIT_FAILURE);
	}
	strcpy(ifr_recv.ifr_name, argv[1]);
	ioctl(sockfd_r, SIOCGIFINDEX, &ifr_recv);
	addr_recv.can_family = AF_CAN;
	addr_recv.can_ifindex = ifr_recv.ifr_ifindex;
	strcpy(ifr_send.ifr_name, argv[2]);
	ioctl(sockfd_s, SIOCGIFINDEX, &ifr_send);
	addr_send.can_family = AF_CAN;
	addr_send.can_ifindex = ifr_send.ifr_ifindex;
	ret = bind(sockfd_r, (struct sockaddr *)&addr_recv, sizeof(addr_recv));
	if (0 > ret)
	{
		perror("bind error");
		close(sockfd_r);
		exit(EXIT_FAILURE);
	}
	ret = bind(sockfd_s, (struct sockaddr *)&addr_send, sizeof(addr_send));
	if (0 > ret)
	{
		perror("bind error");
		close(sockfd_s);
		exit(EXIT_FAILURE);
	}
	setsockopt(sockfd_s, SOL_CAN_RAW, CAN_RAW_FILTER, NULL, 0);
	frame_send.data[0] = 0xAA;
	frame_send.data[1] = 0xBB;
	frame_send.data[2] = 0xCC;
	frame_send.data[3] = 0xDD;
	frame_send.data[4] = 0xEE;
	frame_send.data[5] = 0xFF;
	frame_send.data[6] = 0x11;
	frame_send.data[7] = 0x22;
	frame_send.can_dlc = 8;
	frame_send.can_id = 0x123;
	while(1)
	{
		ret = write(sockfd_s, &frame_send, sizeof(frame_send));
		if(sizeof(frame_send) != ret)
		{
			perror("write error");
			goto out;
		}
		printf("%s send :[%d]",ifr_send.ifr_name,frame_send.can_dlc);
		 for (i = 0; i < frame_send.can_dlc; i++)
						printf("%02x ", frame_send.data[i]);
		sleep(1);
		if (0 > read(sockfd_r, &frame_recv, sizeof(struct can_frame)))
		{
			perror("read error");
			break;
		}
		if (frame_recv.can_id & CAN_ERR_FLAG)
		{
			printf("Error frame_recv!\n");
			break;
		}
			printf("\n%s recv :[%d]", ifr_recv.ifr_name,frame_recv.can_dlc);
		for (i = 0; i < frame_recv.can_dlc; i++)
			printf("%02x ", frame_recv.data[i]);
		printf("\n");
	}
	out:
		close(sockfd_r);
		close(sockfd_s);
		exit(EXIT_SUCCESS);
}
交叉编译源码:
aarch64-linux-gnu-gcc -o cantest cantest.c
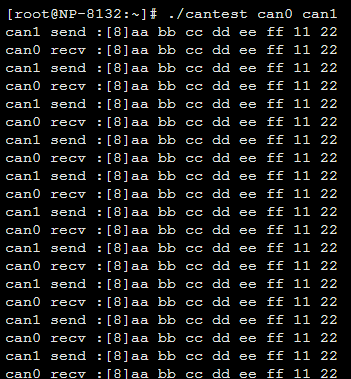
将编译好的程序使用scp 拷贝到8132 主板上,对接CAN0-CAN1执行测试:


